Welcome to The DoodleBLOG!

Hello and welcome to the DoodleBLOG. The official blog of The Doodlebug, Inc. Your scrapbook store, and more!

Friday, July 24, 2020

Tackling a big Memory Keeping Project (AKA Shawn’s Wedding Album – Part 1)


 So, some of you MIGHT have heard me mention once (or a million times). That I was getting married. Maybe you heard me whine about having to relocate the even because of this stupid virus. Maybe you heard that it was like a fairy tale and I had the zaniest, craziest Ring Bearer and Flower Girl in the history of wedding.  Or maybe not. Regardless, the big day happened just about a month ago and now that I have all the thank you cards sent and everything put away and all of the leftovers eaten, it is time to get to work on my wedding album.

OK – BUT WAIT!!!!! – BEFORE you click off this post because you got married like 30 years ago and you have ZERO interest in weddings at the moment, bear with me.  I am using my wedding album as an example here.  This same process and ideas can be applied to just about any large-scale scrappy project, like a baby album, vacation album, senior book or even a mini-book album to give as a gift. I know this because I’ve used this same theory over and over – but you would never know it from looking at the finished products.

Step 1 – Begin with the end in mind. 

Close your eyes. Picture what the finished project looks like.  No, not every page – just the basics.  Is it one album? Two?  A mini book?  A collage for your wall?  Seven albums busting at the seams (hopefully not this one)?  Open your eyes.  It’s not nap time! We need to be working on this project! So, now you know where you are headed.  (These are IDEAS – and NOT my photos)


Step 2 – Narrow down this big picture.

Think a bit more about your vision for the project, and what you are dealing with in terms of the amount of photos/memorabilia that you know need to be included.  In my case I know I plan on at least two books.  One I plan on being a more formal “wedding album” type book and the other more fun and relaxed where I plan to mix regular layouts and pocket pages.  The more formal book is likely to have more single-photo layouts that focus more on portraits with less journaling, while the more fun book will house the bulk of the photos to really tell the story of our day. (Also, I haven't decide which album is which yet - and I'm not sure the one with the name is EXACTLY what I want, so here they are- thoughts??)


Step 3 – START thinking about product. (and maybe buying some)

WOO HOO!!  Time to start shopping!! But go slow here.  Don’t just buy everything that says “wedding” or “baby”, or even everything Rose Gold (hey, I’m giving the advice here, not necessarily TAKING it) Buying too much will not only waste precious $$ and annoy your spouse but it can bury you in too many options, which is just what we need to avoid.  If you are doing a traditional album, now is a good time to look for the album itself.  That may help you choose some of the other product to come later.  If you know you like the idea of using most one or two collections, purchasing them at this point is also good.  Depending on your project timeline, you may spend an hour picking some products or if you are like me you will spread it out over a few months as you work on the project, or plan the event. Just keep in mind you DO NOT have to buy everything right this minute.  You can always come back to shopping later as you figure out more that you need. For me, this meant buying my two albums and a couple of collections I plan to use (“Timeless” by Authentique and “Apricot Honey” by Prima).  But this does not HAVE to mean you buy collections.  It may just mean picking a color scheme, or even finding that ONE product you are going to use to tie the project together.  In one baby album project I did, I had a large circular embellishment for each month of the baby’s first year and I worked each layout around those.


Step 4 – Break it down

This is the spot where the work really gets serious.  For this step, you will start wherever you usually start your process of making pages.  If you start with sketches or Kiwi Lane templates and pick papers and in them and the photos come last, start there.  If your process (like mine) pretty much ALWAYS starts with photos, you will obviously need to wait for those to really get a good start.  I am currently in this phase and already have a few hundred photos with a few hundred more coming soon from the photographer.  Here is where your earlier steps are really going to help you out.  I am planning a 20-30 page book for my “formal” album, and know I will probably want mostly larger single photos.  I intend to basically pick my favorite photos, while keeping in mind that all of the most important things and people need a place in this album, even if I have to pick some less “perfect” photos to make that happen.

For this step I create a folder on my computer called “print” and start dragging or copying all the photos that I KNOW I want in albums into the file.  Then I will have a file for my “Formal” book, and a file for my “casual” book.  For the formal book, I will probably number the photos for the order they will go in in the book.  For the casual book, I’ll have photos arranged by the subject of the page(s) they go on and probably worry about the order later. So I might have “Cake 1….Cake 2….Cake 3”…..”Guests1…Guests 2…guests 3…” etc. Next, I decide on the sizes I want and get the pictures ordered.  If you (like me) have a project that you are anxious to get started on, be SURE you take notes about what size you ordered of each photo.  That way you can start scrapping, even if the photos have not arrived yet.


Step 5 – Keep Organizing (or don’t)

I’ll admit, sometimes I have done this step and sometimes not.  When I HAVE done it, I have really liked how quickly I feel like I am able to get a book to come together – but to be honest I find the process pretty tedious and there are part of me that think it’ easier just to get scrapping and let the chips fall where they may.

Essentially what I do here is use the book itself as an organization tool.  I put the photos (If I have them – if not I make a note – like “Cake 1” on an index card - you can even use the size of card the same size as your photo to REALLY help yourself out) and put them in the page protectors of my album in order.  That way, if there are any specific papers or embellishments you want to use, or pieces of memorabilia, you can stick them in there also and they are ready to go. 

If you don’t want to go quite THAT far, but still want to organize, you can always create a written outline just to sort of keep track of what you want to do and what order things go in.

Step 6 – Well get to it, already!!

Just what it sounds like – Get to work.  You may choose to do every page in order, or skip around.  One of the benefits of being more organized up front (at least for me) is that it lets me feel more “free” during the creative part of the process to work on whatever inspires me at the moment.  If I’m hungry, I might choose to avoid scrapping pictures of the cake at that moment…which BY THE WAYYYY….


As always…if I can answer any questions please shoot me a message or let Hannah know and I’ll be happy to help.  Sorry in advance for all the upcoming wedding hoopla! (but not really)…

Until next time…..from my Happily Ever After to yours,

Shawn


Sunday, July 12, 2020

Graphic 45 Fairie Wings

Monday - July 13, 2020

Hi Scrappy Friends,

This is Dolores, posting for the first time on the blog this week. Please bear with me this is a whole new learning experience for me. But, there's a first time for everything and I'm very excited to be here.

 I wanted to share a few projects with you that I have been working on, with the new Graphic 45 - Fairie Wings line. I have to admit Graphic 45 is my 'favorite' all time product. I have never been disappointed with any line they have ever released. Fairie Wings is my newest favorite. The colors and florals are beautiful.  The Fairy theme, well it could have been designed especially for my 3 year old granddaughter Elizabeth, who pretends to be a Fairy everyday. 

I did a layout page using the printed paper, stickers, chipboard, and the journal cards. The chipboard made perfect frames for my smaller photos. I also added in some 49 and Market and Kaisercraft flowers. To give the flowers a little sparkle I painted them with the Gina K Glitz Glitter Gel. It is perfect for sugar coating the flowers. You can see the difference it made in them. I used the 49 and Market Wishing Bubbles, too.


I also created this table top book. I completely lucked into a purple book. I covered it with paper on the front, back and inside covers. I traced an oval die cut and used an exacto knife to cut out the center of the book. I gradually used smaller dies to get the hollowed out look. I sanded the page edges inside the oval and brushed it with some ink. I inserted the picture and glued all the pages together. Then I decorated the front of the book. I did a lot of fussy cutting flowers (I find that relaxing) and coated them with glossy accents. I added the Gina K Glitz Glitter Gel to the fairy to give her some sparkle. Then again, I used one of the chipboard pieces to frame Elizabeth's picture. I added in a few more 49 and Market flowers and a few little pearls.


As you can see the colors in this paper are just gorgeous. It was a lot of fun to work with. It would make beautiful cards too. I plan to do a mini book next! I will be sending these projects to the store this month, so be sure to come in and check them out. 

I also wanted to share one more product with you. A good friend of mine bought me a little surprise gift. Do your fingers ever look like mine did when I was glittering and gluing (most of the time mine are much worse)??


If they do, let me recommend the Scrubby. I have used it to remove chalk and ink from my hands too. It's perfect to toss in your crop bag or have handy at your scrapbook table. 

Thank you for visiting the blog today. I hope you get to do something creative this week. Share your ideas and creations on the Doodle Dish. Stay safe and healthy. Happy Scrapping!!


Monday, June 29, 2020

A World of Gnomes

Hello and welcome to the blog.  My name is Abby Russell and I'm new to the Doodlebug design team.  This month on the blog I will be talking all about Gnomes.  Who doesn't like these cute little creatures.

I like woodland, magical, and fairy themes because they allow you to open a world of imagination and creativity.  The gnomes in my world live in trees thru small doors or mushroom houses.

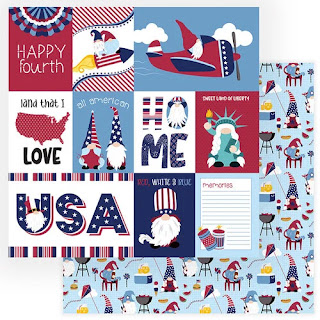
At the Doodlebug you will find an assortment of gnome products.  This month I'm showcasing Gnome for the Holidays - 4th of July.


I sat down with several sheets and created a 1 page and a 2 page layout.   


The 1 page layout design consists of twelve 3x4's cut down slightly to allow for a border on a 12X12.  From the twelve, 3 were from the cut apart sheet - All American.


I embellished the layout with Prima flowers & American Crafts ribbon spool, you can find by the register at the Doodlebug.  


This design allows for multiple photos on 1 page.  I have featured 12 photos here spanning a 3 year time period.  Usually you would have trouble getting this many on a page, but by using smaller photos and a grid style it is easily achieved. 


I love these Scrapbook Generations sketchbooks you can buy at the Doodlebug.  They are a great resource to have because having it at the ready instead of looking up a sketch online is a great timesaver.  


I opened up the volume 8 sketchbook full of 2 page sketches and quickly found one that would work with my photos.


I used diecuts cut using a Cricut smart cutting machine.  If you are wanting to get familiar with using the Cricut the Doodlebug offers a beginner Cricut design space with Robin class. 

I fussy cut Gnomes from the pattern papers to add to my layout.  I placed a journal box from the 3X4 sheet and I was done.  Let's take a closer look at the pages in this 2 page layout.


Also available now at the Doodlebug from Photoplay are 3 more Gnome lines. 


PhotoPlay Collection Pack 12X12-Gnome For Halloween


You will see these in layouts and cards in the coming months from me.  

Another gnome creation I made this month was a card using the magic picture changer dies from Lawn Fawn.


I used the "Gnoming Around" stamp set from Stampendous.   Hannah carries many of the Stampendous gnome stamp sets.  


Pulling on the tab reveals the 2nd image magically.  My card's sentiment is 'Home is where your Gnome is".  


1st you see a cute home, then it reveals the Gnome in the home because home is where your Gnome is.  

Foundations Decor newest Gnome releases are available now to pre-order at the Doodlebug.  


I have 3 of the mushroom houses on pre-order.  I'm thinking either I will decorate 1 each in a Spring/Summer, Fall, and Winter theme or decorate all 3 in a Christmas theme to make a village of houses.  

As you can see it is so much fun to enter the world of the Gnomes and explore a world of imagination and creativity.  Happy crafting my friends.  

- Abby 


Tuesday, June 9, 2020

Meet the 2020 Doodlebug Design Team!


Abby Russel

Hi!  My name is Abby Russell and I’m new to the Doodlebug design team.  I’m an All the Time Mom, full time crafter and part time substitute teacher.  I live in Greene County with my husband of almost 20 years, our three teenagers (Help Us!!) and our family dog, Hazel.  

Crafting is my hobby, my passion and has come to define who I am.  I started my first scrapbook when I was 13 years old after my parents got me a disposable camera on a trip.  It only had simple journaling and no embellishments but got me hooked on photos and saving memories.  Later on, I began attending scrapbook functions with friends, started using embellishments and began our wedding album.  Two years later, when our son was born my husband got me our first digital camera which meant there was no limit in how many pictures I could take to try to capture a moment for a future project.  Scrapbooking is my way of preserving our family’s special moments, memories and history and they’re what I pour my heart into.  In the recent years, I’ve tried to get more adventurous with my page layouts and am always wanting to try new methods and tricks and find new ideas. 

Around 2005, I first got into Christmas card making and have now branched out into almost every holiday and special occasion there is.  I love to make them for our friends and family and I send them to just say “Hi” and that they’re in my heart.  I try to attend 3-4 weekend crops each year and love to travel with my family and be the photographer.  Besides scrapbooking and cards, I also enjoy Diamond Art layouts, stamping, mixed media canvas projects and the wood projects you can find at the Doodlebug.  I’m really looking forward to sharing things with you and learning from one another.
--Abby


Shawn Hillenbrand


Hi!  I am so excited to be a part of the Design Team here at the Doodlebug!  My name is Shawn Hillenbrand (as of 6/20/20 it will be Shawn Sterne).  I live in Evansville and have two interesting kids and one very spoiled dog who keep me on my toes.  In March of 2019 I lost my husband of 27 years (Jason) after a prolonged battle with cancer.  I am, however incredibly lucky to have found love again in a friend (John Sterne) that I have known for many years who lost his wife in 2019.  Expect lots of wedding layouts during this Design Team term!!!! But don’t worry, you’ll see Dobby too – and maybe Devin and Reggie if they are lucky.
I have been scrapbooking for the better part of 20 years and still mainly make pages, but I do make a card or other project every now and then. 
I don’t necessarily have any one specific style and have been known to do a little bit of everything.  Nothing much scares me to try at least once.  I do personally find myself drawn to bright bold colors.  I don’t scrapbook chronologically; I usually just do whatever strikes my fancy at the time.  I have been able to continue to feel inspired to keep scrapping by attending local crops and participating in an online community with a few hundred of my closest scrappy friends. This hobby is my creative outlet, but is also a big part of who I am and I cannot imagine my life without it.

--Shawn


Dolores Johnson


Hello,
My name is Dolores Johnson, I wanted to let you know a little bit about me. I have been married to my best friend, Roger for 42 years. Together we share four grown up sons Dan, Matt, Travis and Rob. We also have six beautiful grandchildren Macey, Hunter, Tatum, Bowen, Elizabeth and Lincoln. We live in Greenwood. I am the office manager for a commercial Insulation company in Indianapolis. I love to spend time with my family and friends, travel, read and CREATE.

I have been scrapbooking and card making for over 25 years. My scrapbooking has evolved from my kitchen tabletop (when my boys filled my house) to a whole crafting room full of my treasures. Fortunately for me having a big family supplies me with many photos to fill my scrapbook pages. I try to never buy a store-bought card, and I also try to never make two identical handmade cards to give away. Right now, the thing I enjoy making the most is “mini books”. I am very interested in the art of “junk journaling” and have that on my to do list. I am passionate about creating, learning, teaching and sharing.

My favorite thing about scrapbooking is that each one of us takes this one hobby and makes it their own. It is always created from the heart, no right way – no wrong way, its all beautiful. I am very thankful for this opportunity and I am so excited to share my perspective of creating with all you.

--Dolores


LeighAnn Frick


Hi crafty friends! My name is Leigh Ann Frick. I live in Huntingburg with my husband and our two children, ages 5 and 6.  There are also two spoiled Maltese dogs and a lazy cat here that may make an appearance in my projects. 

I have always had a love of photography and documenting my experiences. In high school my parents gave me a basic scrapbooking kit and that got me hooked. I lost interest due to a lack of options at that time. When we were planning our wedding, I found The Doodlebug and I have been scrapbooking ever since with only a few breaks when my kids were babies. 

I started with making 12x12 pages, then ventured into card making, and back to pages for several years, and dipped my toes in the world of decorative planning. In the past few years I have began making mini albums and mixed media art. I still make some layouts to document my kids, but most of my projects are minis and mixed media now. 

Some of my favorite product lines are Simple Stories, Prima, Graphic 45, and Authentique. I love using Tim Holtz and Prima products in mixed media. I am also a huge fan of Finnabair!

--Leigh Ann

Rolodex Scrapbooking


Recently my sister and I travelled to California and had the opportunity to visit the Frank Garcia’s Studio. He is the Prima Marketing Creative Director and an amazing designer. There were two samples that caught my eye as something interesting and I had not seen in person, Rolodex scrapbooks. One used the Heidi Swapp Rolodex and the other used a Tim Holtz wood tray.


A traditional Rolodex once used to hold important phone numbers and addresses and sometimes business cards. Once a must have office tool now has been reimagined as a scrapbooking tool. Unfortunately, the Heidi Swapp Rolodex has been discontinued, but you may be able to find an older office supply one around. I am using a Tim Holtz wood tray and 1/4 “ dowel rod for my sample. There are dies available to cut the cards or you can make your own. I have a collection of 3X4 journaling card from several paper collections that I plan on using. You can add in loaded envelopes with left over ephemera, shaker cards and more. The possibilities are endless!


The Rolodex is easy to have on a desk at work to scroll through and have a new picture or inspirational saying up each day.  A sample on Pinterest showed using one as a calendar. The tray sample at Frank’s studio was made by a team member and she wanted to use up leftovers from class kits, the cards theme and colors did not necessarily match and it was super cute. A great way to use up those scraps laying around.