Welcome to The DoodleBLOG!

Hello and welcome to the DoodleBLOG. The official blog of The Doodlebug, Inc. Your scrapbook store, and more!

Tuesday, June 25, 2019

Prima Waxes


Hello fellow crafters I would like to take a few minutes and review the Prima waxes. Prima waxes are beeswax-based paste that allow you two effects out of one product. The wax will give you generous color and shiny results on dark backgrounds and iridescence on lighter backgrounds. The waxes allow for a vintage and even antiqued look when used on projects. The waxes can be used on any type of surface, when allowed to dry for 24 hours are permanent. Prima designer, Finnabair, developed the waxes as part of her mixed media line, with several colors to choose for your projects. One particular color line of the waxes are called “Opal Magic”. The opal magic line gives amazing color on dark/black backgrounds and very subtle color on light/white backgrounds. I was not sure about this line until my sister and I took a class with Finnabair using the opal magic waxes, and magic is the right term on a black background.  Click here to check out the waxes available at The Doodlebug now!


How or what to use to apply the wax? For smaller projects use your finger(s),or a small paint brush. For large projects, or to cover a large surface area you can use a large paint brush or a wax brush. In our class with Finnabair, we used a wax brush for the large surface area covering at one time. The takeaway here is not that you need to buy a special brush for the wax, but do use a nice quality brush. A cheap brush will drop fibers/bristles in your project and cause you frustration.
You are probably asking what is a wax brush? I had not heard of this type of brush before, it is used for applying paste type wax on furniture. I cannot stress enough that a little wax, goes a long way. You can get a feel for applying wax on a blank piece of paper before beginning your project. Finnabair recommended using our fingers, and if we had to much to use our hand as a palate. 
This is a project I recently made using the large uneven pallet from The Doodlebug and Prima waxes along with various papers and embellishments.  I have linked the products I used below.


Tuesday, June 18, 2019

What's all the hoopla about?

Hello Paper Crafters…What's all the hoopla about?  It's about those wonderful embroidery hoops that are finding a new life in paper crafting. 
When I was a teen, my Aunt Betty loved to cross stitch, and she was gracious enough to teach me.  Including her picture on my embroidery hoop project was a wonderful way to remember her and her kindness to me. 


Let's talk about how I made this project.  I started by looking through the wonderful 49 and Market “Bold and Beautiful” line to determine the papers I would use for the project.  I chose the floral side of the "Lovely" sheet for the background.  On the opposite side of this sheet was a small area with a dictionary print, which included the word "Loveable."  I used this piece as the smallest layer behind the picture frame.


I used an 8" wood embroidery hoop and traced around the outer edge of the hoop on the floral side of the "Lovely" paper.  Then, I covered the hoop in white Gesso, which prepared the surface of the hoop for painting.  


Once the Gesso dried, I painted the embroidery hoop with FolkArt Acrylic Paint.  The color is Seashell Pink.  


Once the acrylic paint was dry, I glued the two hoops together with Nuvo Deluxe Adhesive.


Then, I trimmed the outer edge of the hoop with lace using Nuvo Deluxe Adhesive.  
I used the Cutter Bee Scissors to cut out the traced hoop from the "Lovely" floral paper and applied it to the back of the hoop using Nuvo Deluxe Adhesive.


As part of the 49 and Market “Bold and Beautiful” line, they have the prettiest embellishments called "Laser Cut Shapes."


From the “Laser Cut Shapes” sheet, I used the back (pink color) of the large post card (at the bottom) for the largest layer behind the frame.

The next layer came from the "Garden Letters" sheet.  I used the beige and white polka dots from the center of the sheet. 


The final layer came from the "Loveable" dictionary words cut out from the "Lovely" sheet.   I distressed the edges of each sheet with the Tim Holtz Tonic Paper Distresser leaving a tattered edge.  The layers were applied with lace peeking out of the upper right corner.  


Next up was the special picture.  It was framed with a frame from the Tim Holtz idea-ology Baseboard Frames-Lace set.  Due to the layering on the left side of the frame, the right side is popped up with Scotch Foam Mounting Tape.


You may notice the green board peeking out from under the frame.  It's my favorite paper trimmer - The CutterPillar Pro.  Also available is a handy carrying case.  


Now, it's time for the embellishments.  Two stamps and leaves from the "Laser Cut Shapes" are attached to the frame.  Curving the leaves downward gave them dimension.

The focal point is a combination of 49 and Market and Prima flowers with lace tucked behind.  Some of the flower were a little bright, so I tapped them with a white pen to soften the color.  Also, the white pen was used to make stitch lines around the pink layer of paper.  Pink pearls were attached to the lace and white pearls pop out of the flowers.  For a shabby chic accent, white pearls were individually added around the hoop and a white ribbon graces the top. 


Visit The Doodlebug, Inc., in Jasper, IN, to see more of the beautiful 49 and Market “Bold and Beautiful” line and the other products shown in this blog; or, shop online at The Doodlebug!  
Thanks for checking out my What's all the Hoopla About?" project.  Until next time, happy crafting with The Doodlebug!
Melody

Tuesday, June 11, 2019

Four New Uses for Washi Tape!

Who doesnt LOVE Washi Tape!!!

Washi tape, what is that you ask? It is probably one of the greatest craft supplies EVER.  Not only can you use it for crafts, it can be used for so many every day things, it is amazing.

I love using it for greeting cards because it is a quick easy way to have a beautiful and unique look.  Check out these cute little feathers I made using a toothpick and washi tape.


Or, if you are like me and have multiple sets of markers or sharpies it is a great way to keep the set together by just wrapping a small piece at the end of each marker.  This is also a nice way to mark your supplies if you crop with friends. 


This small wood panel took me less than 10 minutes to make and is a great gift or a desk decoration for your office or home.  I may even have to get more of these to keep on hand to make in a hurry for a gift.


Need a cute embellishment for a layout but can't find just the right thing, I covered these plain wood clothespins and can go with any layout!


The possibilities are endless!!!!!  Check out The Doodlebug's Selection of washi tape and storage accessories here!


~~Amy~~

Thursday, June 6, 2019

Wood Slices Wreath- A Quick and Easy Project


I hear people EVERYDAY tell me that they just are not crafty...and you know what I say- "At The Doodlebug, we make the Un-Crafty, look CRAFY and the Crafty look AMAZING!"

THIS is one of those projects!  If you are crafty, you can kick it up a notch with an AMAZING bow or make the flowers yourself or add a pennant banner through the middle that says welcome...well you get the picture here, there is A LOT more you can do with this!  BUT, if you need a quick project (an hour or so) and you are sell proclaimed "Un-Crafty," then this is a project for you!

Janice made this wreath for us for a store sample and I am LOVING IT!!  So much so, I wanted to share some of the step by step tips that she used.

First- start with 3 packs of wood slices


Second, you will need a 12" brass ring


Next Cut a few circles our of a piece of black felt.  You will use these to glue the wood slices on.
Lay your ring on the table and space out your first layer of wood slices,  Glue the felt on the back to hold the wood to the ring.

Once this layer is done, flip your wreath over and fill in the spaces with that second and final layer of wood slices.  These you will hot glue on.  No need for the felt on this layer.


Now for the BEST PART...It's time to EMBELLISH!  
We chose to add a few felt flowers to our wreath.  We have a nice variety of these, so I'm sure that you can find a color that suits your style!


AND....The Finish Project!  Easy and Amazing!  


Products Used:

Tuesday, June 4, 2019

Summer Layout Inspiration

Today I am sharing a summer layout using Sunshine and Blue Skies from Simple Stories. These are the papers and sticker sheet I used.


The inspiration for my layout came from Pinterest. I chose a layout that would help me use as many of the fun words, sayings and artwork as I could from the paper. The inspiration layout is shown here.  


I started my layout by choosing the navy dot paper as my base.   I cut a piece off both the top and bottom of the page and added a strip of the Popsicle patterned paper to those edges. That allowed me to use even more of these cute patterns. I distressed the edges of the papers but chose not to ink them on this layout.  To build the focal point, I started with larger pieces from a couple of the other patterned papers..  Next, I chose some of the little squares I wanted to use and played with the placement of those until I was happy with them. I decided I wanted a little more color and texture, so I added various other squares under them for color and height.   My tiny attacher was used to staple some of the elements together, while others I just used my ATG runner to adhere. I went through the sticker page and picked some words and tabs to add to the squares.  I didn't have a photo chosen yet, so I just made sure to leave a spot for it.


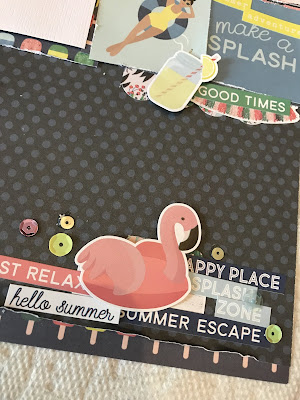
Once I was satisfied with the focal portion of my page, I added 2 embellishment clusters to draw your eye across the page. One is on the top left and one on the bottom right.  These are made up of some bits of paper layered with the word and design stickers from the sticker sheet.  I popped some of the stickers up with foam tape


My final additions were made by using Glossy Accents on a few areas, like the sunglasses, and adding some scattered random sequins I had in my stash that were adhered to the page with Glossy Accents. I think it turned out to be a fun page. I can’t wait to choose a summer photo to add to it. Here is one last look at the whole layout. 


Thank you for reading!  I hope this inspires you when creating summer layouts. 

~Tina~


These items were used and can all be found at The Doodlebug, Inc.: