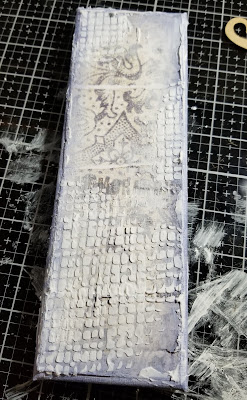
I started by giving my blank canvas a coat of gesso to prime it, and then adhered my distressed pieces of paper to the canvas with soft matte gel. I used Prima's Heavy Body White Gesso and Prima's Soft Matte Gel.
Gel medium does take a long time to dry, even in a thin coat like what is used here, but in the long run it will give better results than mod podge. Gel medium will not turn yellow or crack over time. While it was drying I cut a few wood planks from cardstock. This can be cut on a Silhouette or Cricut, or there is a Tim Holtz Bigz Die that The Doodlebug can order for you. I lightly sprayed the planks with water and ran them through a wood grain embossing folder. Then I sprayed them with Distress Oxide Spray in Vintage Photo. Once the gel dried I whitewashed the canvas, my die cut wood pieces, and the net, with gesso.
I dried the canvas with my embossing gun to speed up the process. I used the Life Changing Brushes by Picket Fence to apply Chipped Sapphire Distress Oxide to the sides and the edges of the front of the canvas
I went back and dry brushed the edges with white gesso after applying the ink to give it more of a weathered shabby chic look.
After the gesso dried I applied Light and Fluffy Modeling Paste by The Crafter's Workshop through a Tim Holtz stencil for more texture. The key to building a good base for a mixed media project is the layering of textures and colors.
Side note, if you don't have a glass media mat, you are seriously missing out! See all that gesso and mess on my mat? It wiped right up with a baby wipe! I personally have the black Tim Holtz Glass Media Mat, but you can find a few different options at The Doodlebug to suit your specific needs.
While my canvas was drying I altered the chipboard pieces that I used in the canvas. I applied Prima Stone Effect Paste in Pumice to the shells. I would suggest giving the chipboard a coat of gesso before using these pastes. This is a great set of pastes that come in pumice, limestone, and concrete. If you would like to order a set, just send a message to The Doodlebug!
For the foliage chipboard, I pressed them into an embossing pad, then randomly added gold and a brown earthy tone embossing powders to give the pieces a two-tone look. For the seahorse, I embossed the entire piece with the earthy brown powder.
Next I
assembled all of the main pieces. I like to keep chipboard trash and
use it to give pieces dimension in my mixed media projects (just ask Hannah about my "dumpster diving" habits lol.) I have plain
chipboard glued under the wood planks, the large shell, and the seahorse to
lift them off of the canvas. One option to attach the items is to use gel medium like I used on the paper, but I am personally too impatient for the dry time. I prefer to use Beacon 3 in 1 or 450 Quick Dry Glue. These are heavy duty clear thick liquid adhesives that dry quickly, but still give you time to work with your pieces.
Once I had my main elements in place and glued down I added the rest of my embellishments. I also added art stones and glass glitter into the "cracks and crevices" using gel medium.
Once all of my pieces were in place and glue was dried, I used Prima Waxes in Vintage Gold and Copper to highlight raised areas over the entire piece. I went back over that and dry brushed gesso lightly to take the edge off of the wax color and bring it back to a weathered looked. Here is the finished product and a couple of close ups. I hope you have enjoyed this tutorial, and of course if you have any questions about the process to recreate this for yourself, just leave them in the comments!!
Products used in this piece (click the pictures for more information or to purchase):
 |
| White Gesso |
 |
| Gel Medium |
 |
| Woodgrain Embossing Folder |
 |
| Distress Oxide Spray |
 |
| Life Changing Blender Brushes |
 |
| Distress Oxide |
 |
| Light & Fluffy Modeling Paste |
 |
| Tim Holtz Glass Media Mat |
 |
| Embossing Pad |
 |
| 450 Quick Dry |
 |
| Art Stones |
 |
| Prima Wax |


3 comments:
Very pretty, great treasure to keep too..nothing wrong with a good dumpster dive😉
What a great idea to remember your trip. Thanks for the tutorial on your steps to make the piece come together.
Beautiful! Great tutorial on what and how you used the products.
Post a Comment