Hi, Crafters! Today I am showing you how I make Farmhouse signs. Since I do not have the capability to cut wood to make
wooden signs, I had to use another method.
I tried the Reverse Canvas signs.
These are really quick and easy to put together to get a similar farmhouse
look.
If you haven’t tried this method, here are the steps I used
to get the look I wanted.
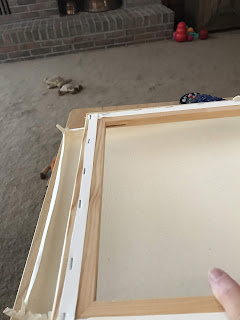
I took a blank canvas and flipped it to the back. Using a craft knife, I cut the canvas from
the frame by cutting on the outside of the staples. If you prefer, you could instead pull the staples to
remove the canvas. This is just a really
quick way to get started. And the staples will be covered up in the end. This method of removal left the corners of the canvas a little rough, with extra pieces of canvas. I just used scissors to trim that up.
After the canvas was removed from the wooden frame, I flipped the
frame over to see what looked like an average unfinished frame. Now I was ready to finish the frame.
How you choose to finish the frame, is entirely up to you. I used some wood stain we had in the garage.
I was making this as a gift, and knew what wording/design I wanted to use. I set up my design in my Silhouette Studio design software. You can use whatever cutting software you are familiar with. You do not have to own a digital cutting machine in order to make this project. You could use stencils, paint, and any number of things to get the look you like.
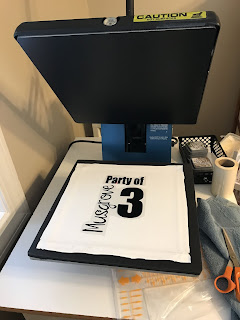
I used Heat Transfer Vinyl for the design, so I had to remember to mirror my design before I cut it. Once cut, I weeded to remove the extra vinyl off the carrier sheet. Next, I turned on my
heat press (you could use an iron or Cricut Easy Press).
While it was heating up, I played with the vinyl design and placement on
the canvas. I placed my canvas, right
side up, on the platform of my press and gave it a press for a few seconds before placing the vinyl. This got any moisture out of the canvas and it made the surface smoother so it was easier to figure out the placement for the design. When happy with the placement of my design, I covered with a Teflon sheet for a little extra protection from the heat, and pressed for the
manufacturer’s recommended time. Once pressed, I removed the vinyl’s carrier sheet very carefully, to make sure
it was all adhered. Then, as I always do when heat pressing, I placed the Teflon sheet back over it and re-pressed for a few more seconds. This was just to catch the edges of my
design in case they lifted slightly when removing the carrier sheet.
Now all I had to do was center my decorated canvas on the back of the frame and adhere it to the frame. I usually use a staple gun, but you could use hot glue, a staple gun, or whatever method you prefer to keep it in place. The sign was now complete! The back could also be covered with paper, chipboard, etc. if a more finished look is preferred.
If you like this look and haven't tried it yet, please give it a try. It is the perfect way to change up a little home decor for yourself, or it is a quick way to make a gift for someone.
Thank you for reading. The products I used are listed below and can be found at The Doodlebug, Inc. in Jasper, Indiana.
~Tina J.~
Supplies used:
Cricut Easy Press- Call The Doodlebug at 812-482-4949 to ask about ordering an Easy Press!


1 comment:
Thanks for sharing, that's a cute gift, love how easy it is and looks fabulous! ❤
Post a Comment